Login
Our 3D CAD supplier models have been moved to 3Dfindit.com, the new visual search engine for 3D CAD, CAE & BIM models.
You can log in there with your existing account of this site.
The content remains free of charge.

Top Links
Categories


Search FAQs
Most Recent FAQs
-
0 comments, 0 likes, 3,480 views100% helpful.
-
0 comments, 0 likes, 4,683 views100% helpful.
-
0 comments, 0 likes, 10,506 views
Most Viewed FAQs
-
0 comments, 0 likes, 129,085 views0% helpful.
-
0 comments, 0 likes, 24,042 views
-
0 comments, 0 likes, 21,263 views18% helpful.
FAQs
-
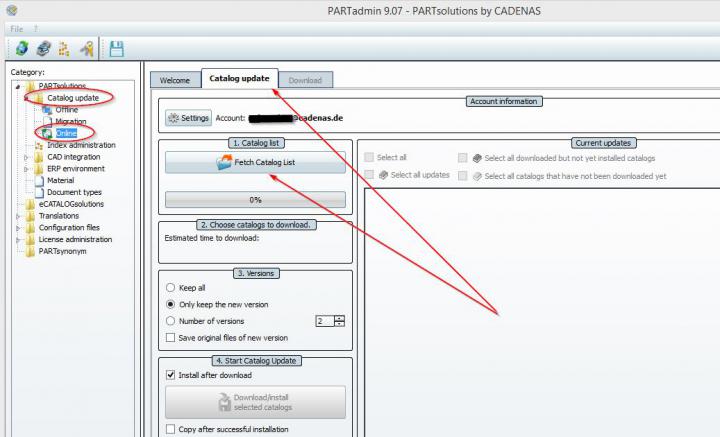
open module PARTadmin -> ...-> Online further help regarding updating catalogs by clicking F1 within PARTsolutions
-
You will find the latest CATIA Interface on our FTP. For details you can write a direct Email to support@cadenas.de and we ...
-
1. Please use the form which can download with the following link: Hardware exchange 2. For licensing the Host-I...
1. Please use the form which can download with the following link:
Hardware exchange
2. For licensing the Host-ID (MAC address) of the old and the new computer is required.
-> The Host-ID can be selected in the license manager PARTadmin.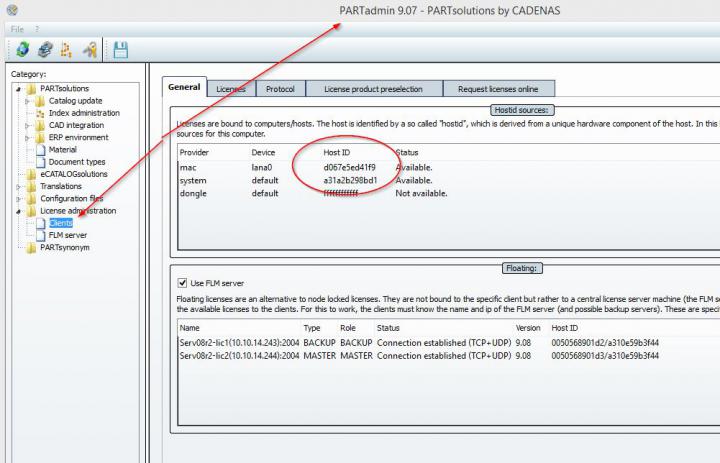
3. Get further help regarding licensing by clicking F1 within PARTsolutions
 Permalink | 0 comments, 0 likes, 15,683 views100% users marked this FAQ as helpful.|2 votesWas this answer helpful?
 -
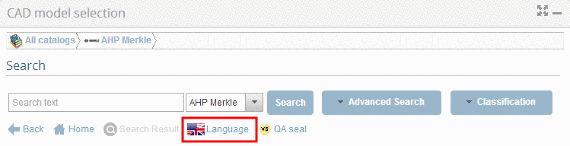
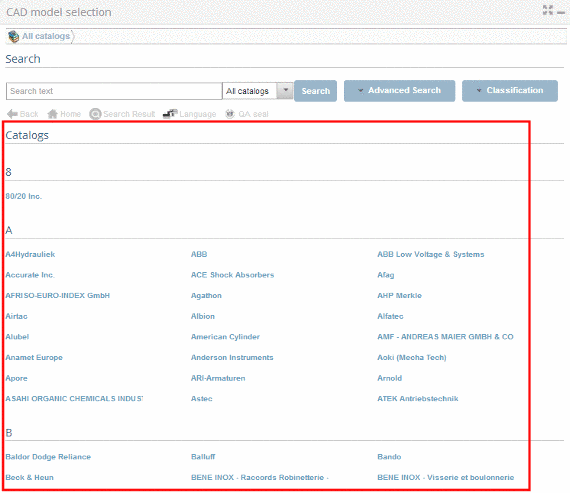
Follow the steps listed below to reach your desired part: Make sure that your are in the dialog area 3D CAD CATALOGS. Select th...
Follow the steps listed below to reach your desired part:
-
After you have selected a catalog, you may now select the catalog language.
-
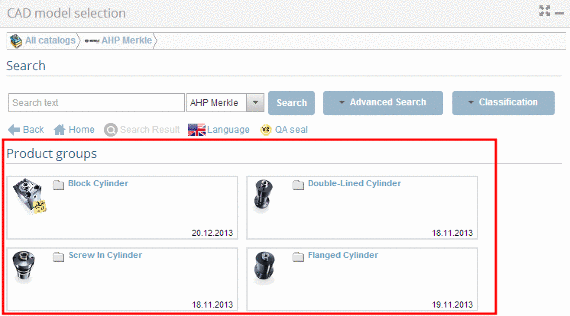
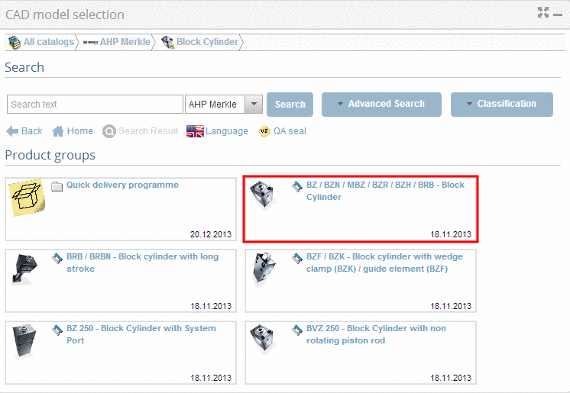
At directory level
 select product groups as long as a concrete assembly
  or concrete single part
  has been specified.
 -
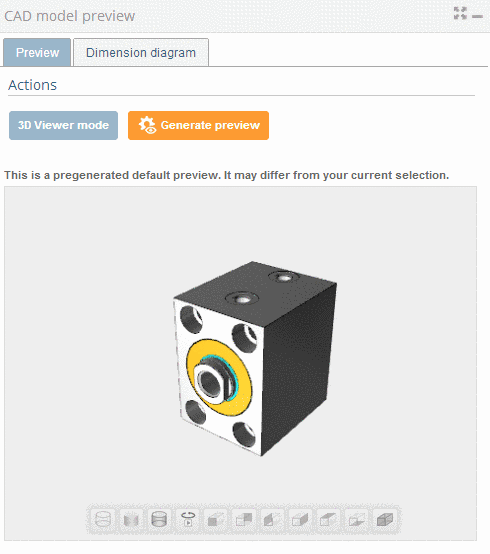
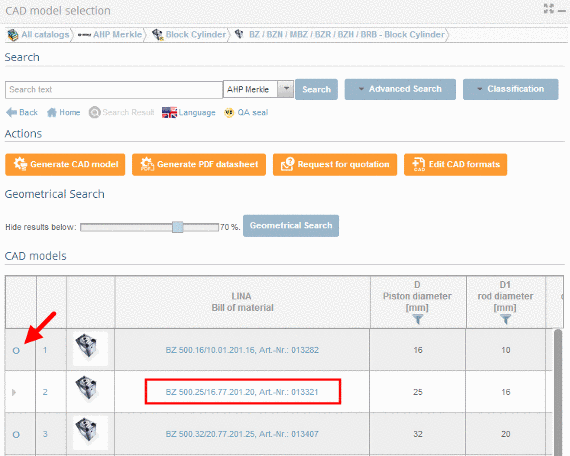
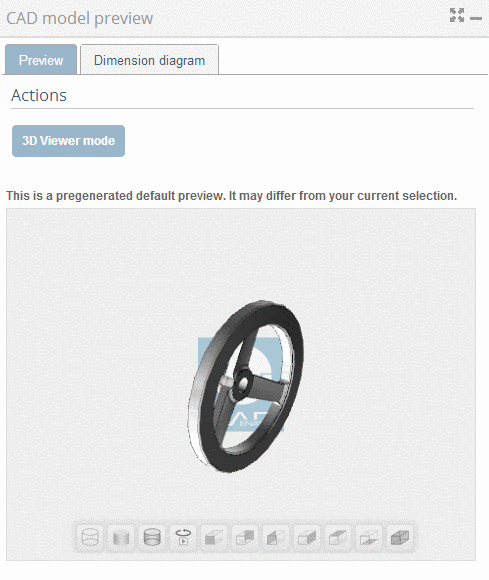
As soon as a concrete row has been determined, a 3D view and dimensional drawings are loaded under CAD model preview.
-
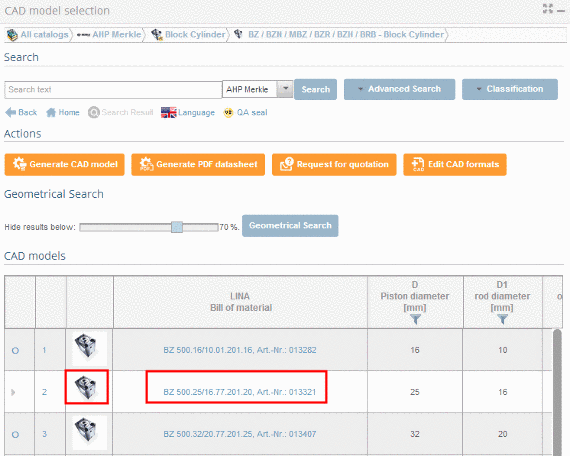
Define the characteristic of the part, by clicking into the option button before the desired row.
-
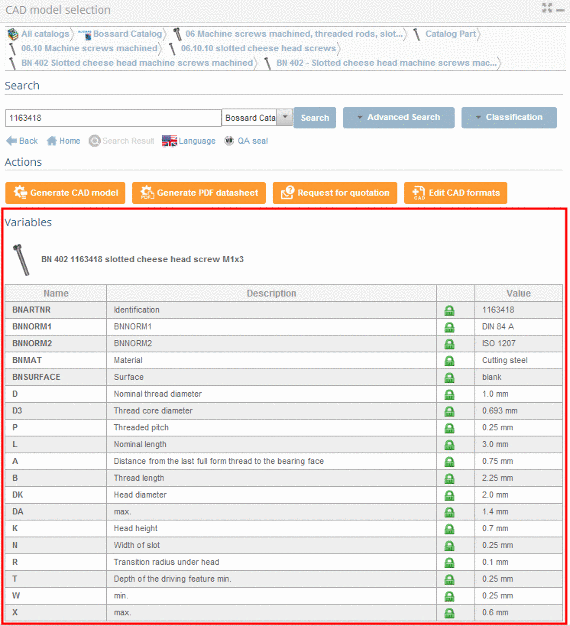
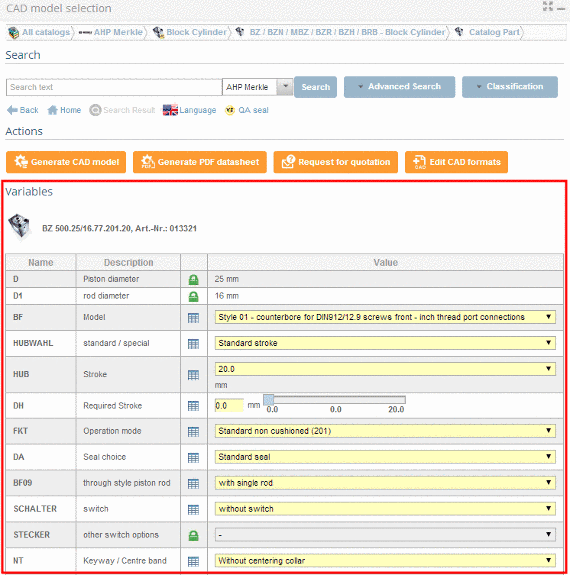
Variable view (possibly set value ranges)
In order to reach the variable view, click on the part link or preview image.
-> You can now see all variables in list form.
In case value range fields are available - you will recognize this by the yellow-highlighted fields - use the arrow
 button in order to open these fields and select the desired value and simply enter it directly into the input area (alternatively also possible using a slider).
Permalink | 0 comments, 0 likes, 6,447 views100% users marked this FAQ as helpful.|1 voteWas this answer helpful? -
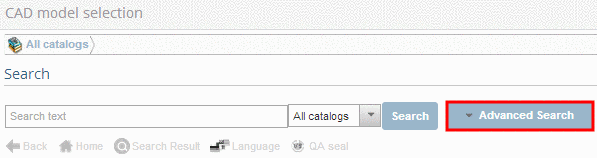
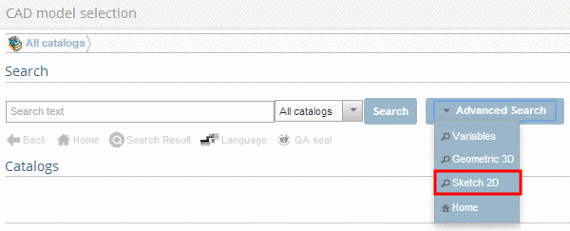
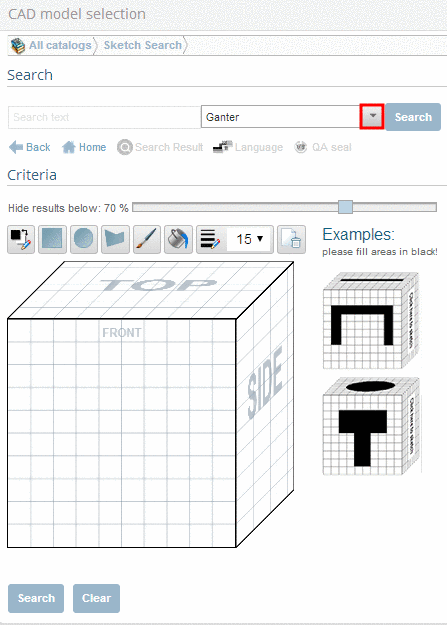
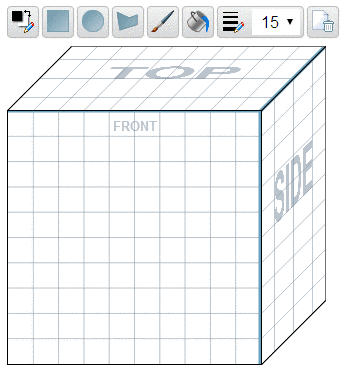
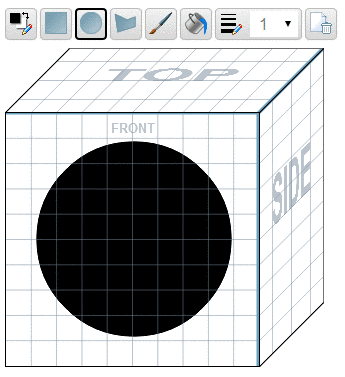
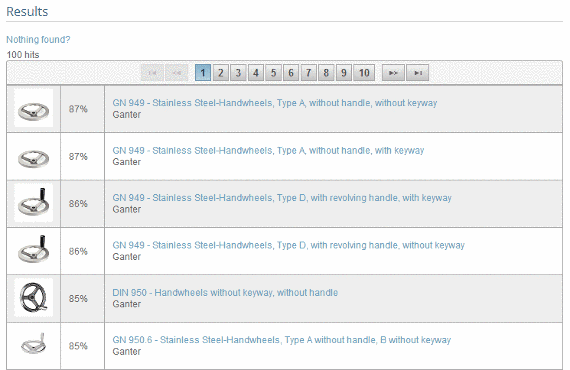
You can conduct a search based on self-drawn sketches. NoteFor a successful search, the part should be represented by at least 2...
You can conduct a search based on self-drawn sketches.
Note
For a successful search, the part should be represented by at least 2 views (for example: top, right).-
Open the list field by arrow button and select the catalog which you want to search through.
-
In order to draw the first sketch, click on the desired view (Top, Front, Side).
-
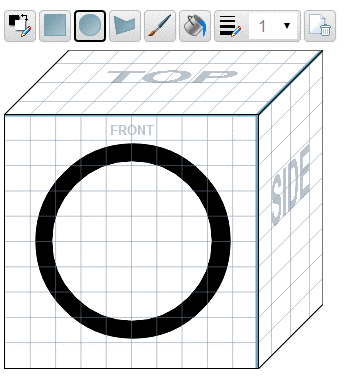
With your left mouse button, click into the center of the sketch and pull open a black circle by holding down the left mouse button.
-
With the left mouse button, click into the midpoint of the sketch and pull open a smaller white circle whilst holding down the left mouse button.
-
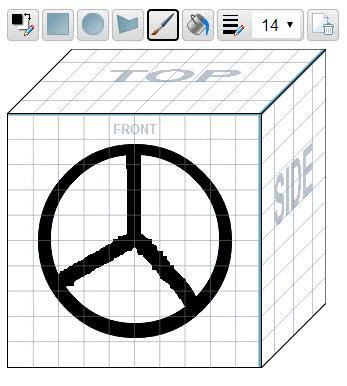
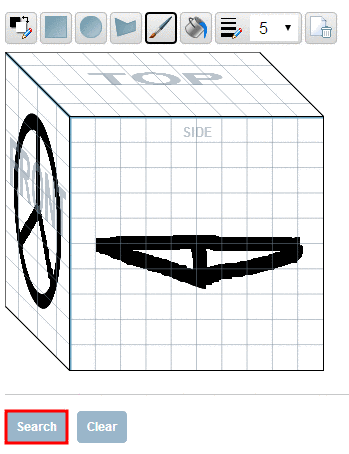
Click into the next view box in order to make your second sketch. Draw a second version of the hand wheel. The settings are already set correctly.
-
Note
After a search was conducted, the created sketches are saved and are available for use upon next launch (in the current situation they are available for use until you log off)
Permalink | 0 comments, 0 likes, 1,520 views100% users marked this FAQ as helpful.|1 voteWas this answer helpful? -
On this free portal (PARTcommunity) there are no standards available but all other catalogs.To receive standard parts you may switch to o...
-
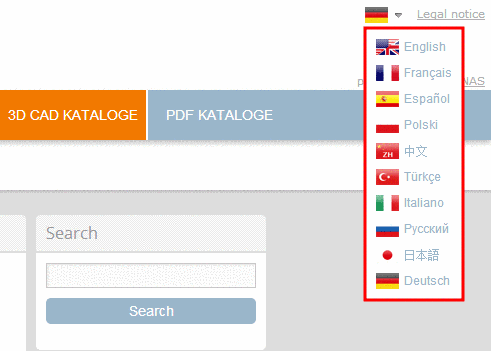
Click on the flag right above on the open portal. -> A dropdown-menu opens showing all available languages. &nbs...
-
Please check the following points: - does the part look like the 3D preview of the portal?- is the part also wrong in other export forma...
Please check the following points:
- does the part look like the 3D preview of the portal?
- is the part also wrong in other export formats(e.g. STEP)?If your problem could not be solved please contact the support team
via Ask Question in the FAQ area.
Permalink | 0 comments, 0 likes, 12,323 views100% users marked this FAQ as helpful.|3 votesWas this answer helpful? -
1. Register on PARTcommunity.com 2. Upload your 3D model on 3D SHARE - PARTcloud.net 3. Choose "Cha...
1. Register on PARTcommunity.com
2. Upload your 3D model on 3D SHARE - PARTcloud.net
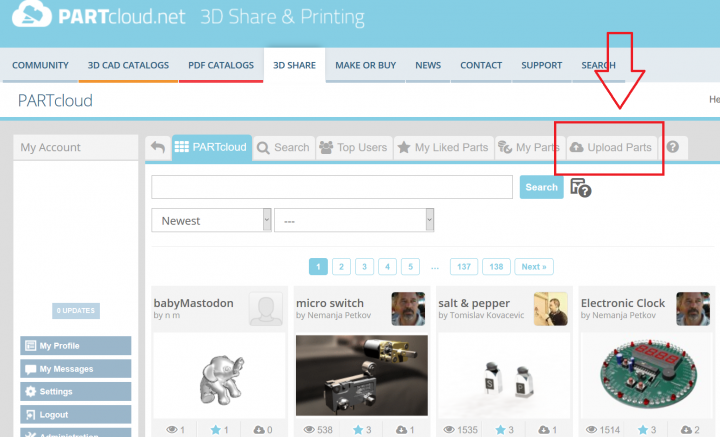
3. Choose "Challenges" category (no need to choose subcategory). First you upload files, then renders (Upload Image).
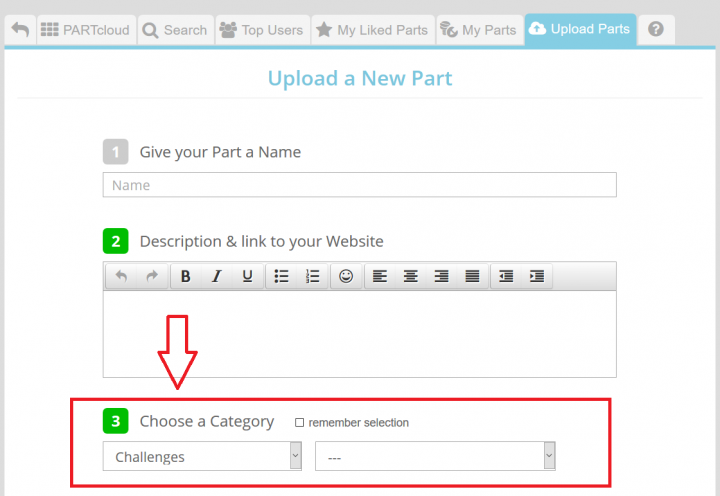
4. Choose the right license depending on your choice.
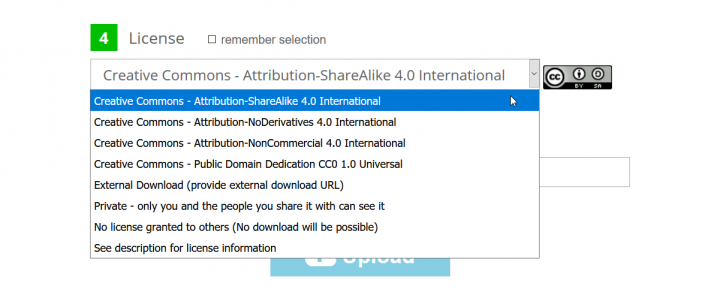
5. Done. You can upload as many 3D models as you wish for the Weekly Challenge and good luck!
Permalink | 3 comments, 1 like, 6,743 views88% users marked this FAQ as helpful.|8 votesWas this answer helpful? -
Here you'll find the PARTsolutions DVD for downloading: PARTupdate The Software is only provided for customers in maintenance or after ...
-
You probably have reached the daily download limit, your account is not activated or the tickets are not enabled for your account. Pleas...
-
1.) Open your 3D Model and selct the UPLOAD IMAGE button
-
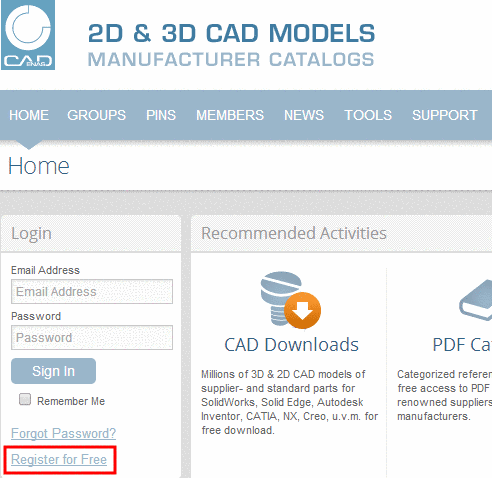
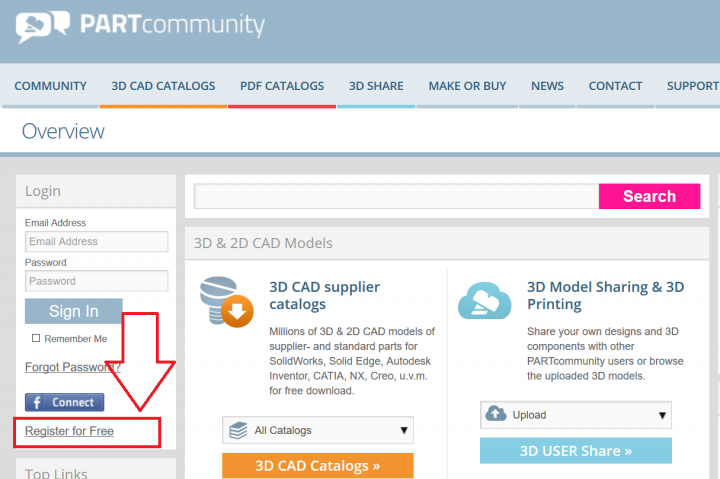
Downloading parts is not possible without being registered On the left side, click on the button "Register for Free" in ...
-
Downloading parts is not possible without being registered
-
On the left side, click on the button "Register for Free" in order to create a free account.
-> A dialog opens with a form for inputting your account information.
-
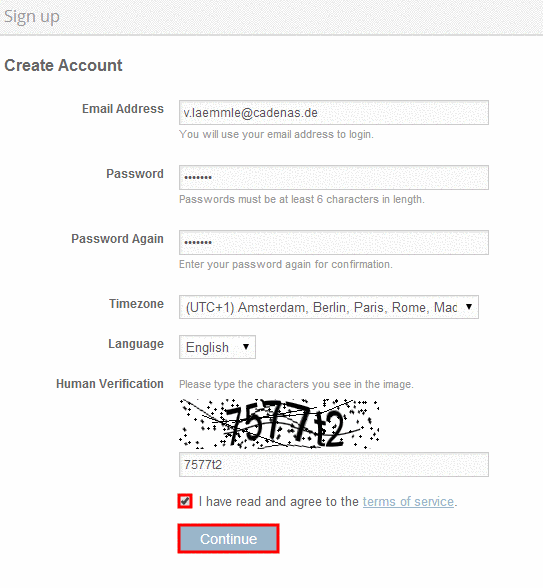
All fields are required to be filled in and the terms of use must be accepted. Click "Continue" at the bottom of the page to proceed with registration.
-
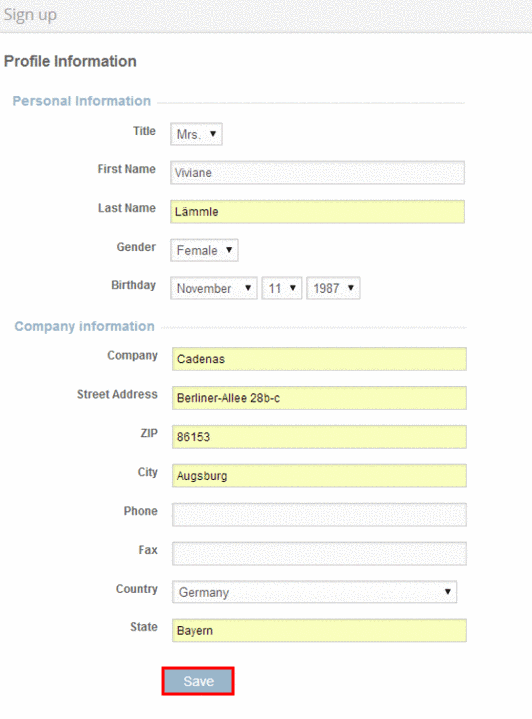
In the next step the personal informations and informations about the company must be specified. Furthermore the field of activity, the CAD System, the PLM- or ERP system and more contact details can be specified.
-
In order to verify that your details are correct, click on "Save"
The following details must be specified for a successful registration:
First name, last name, company, zip code, country.
By entering invalid Information appropriate information appears.
-
-
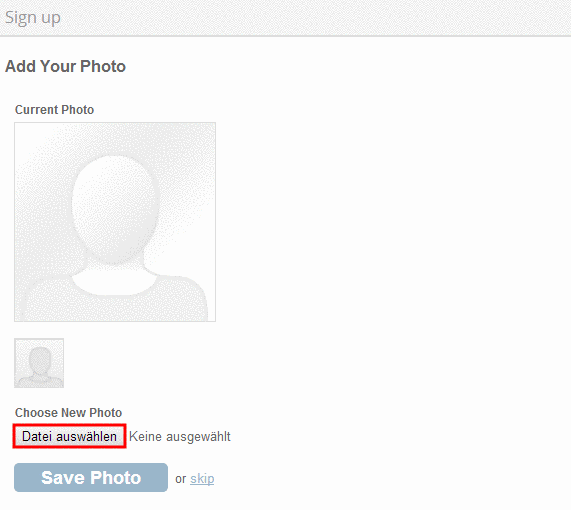
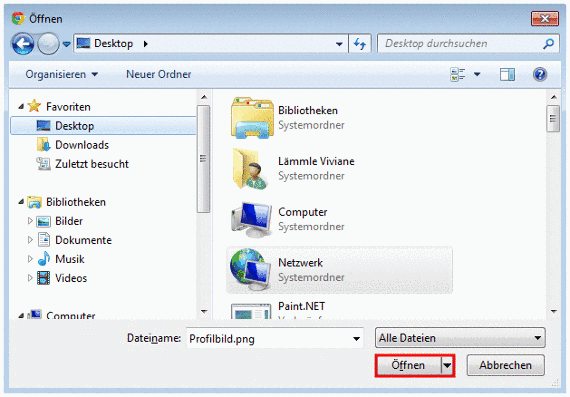
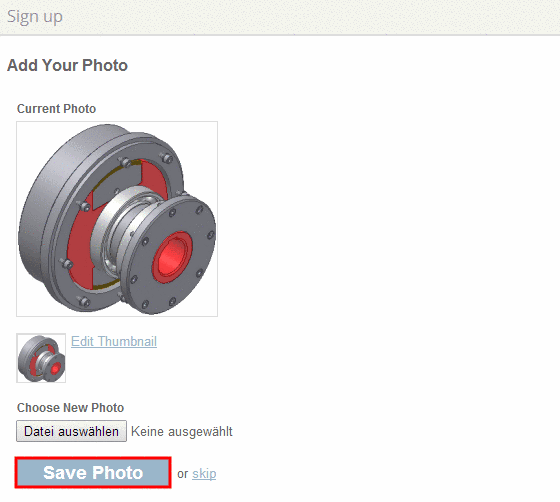
Choose the desired picture and open it by clicking the button "Open".
-
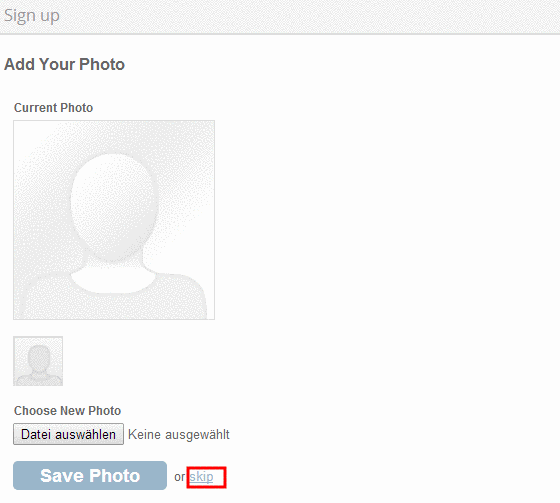
-> If no picture shall be uploaded this step can be skipped.
-
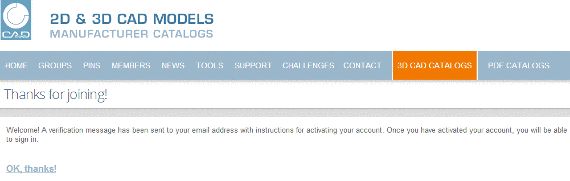
-> You will receive the confirmation „Thanks for joining!“
-> The activation link will be sent to the specified e-mail address automatically.
-
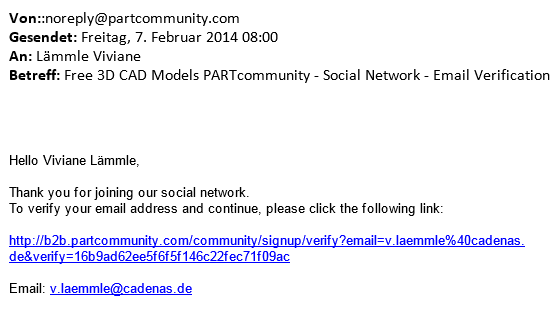
Open the e-mail sent to you and activate your account by clicking on the activation link.
-
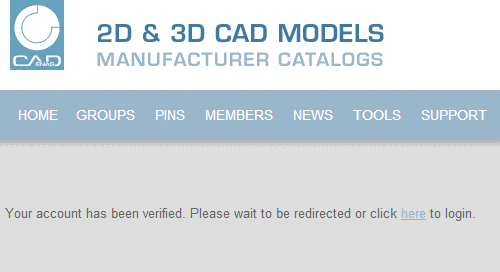
You will receive the confirmation „Your account has been verified. Please wait to be redirected or click here to login“ after that.
Furthermore you receive a welcoming e-mail of PARTcommunity, in which you'll be invited to login.
-
Permalink | 0 comments, 0 likes, 15,386 views67% users marked this FAQ as helpful.|3 votesWas this answer helpful? -
-
-> The activation link will be sent to the specified address automatically. Open the e-mail sent to you and activate your acc...
-
-> The activation link will be sent to the specified address automatically.
-
Open the e-mail sent to you and activate your account by clicking on the activation link.
-
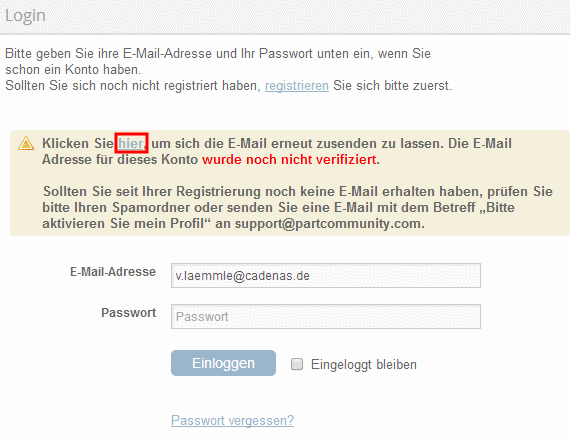
Please check your spam folder if you have not received any activation link since the registration yet.
-> If you can't find the e-mail anymore you can request the activation link again.
-
Enter your access data and click on "Login".
-
In order to request the activation link again click on "here".
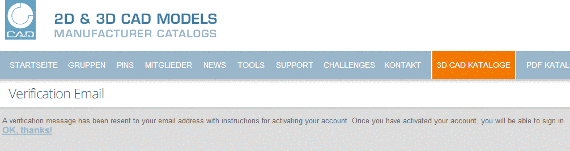
-> You will receive the confirmation „Verification Email“.
-
Open the e-mail sent to you and activate your account by clicking on the activation link.
-> Afterwards you will receive the confirmation "Your account has been verified. Please wait to be redirected or click here to login“.
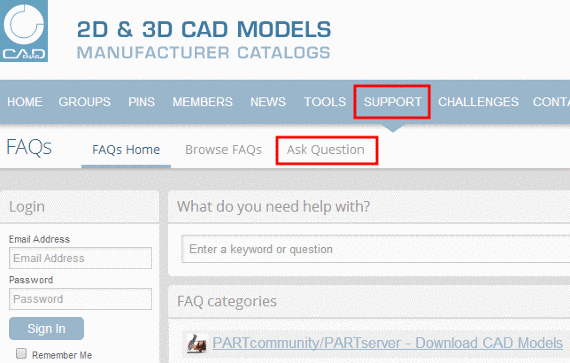
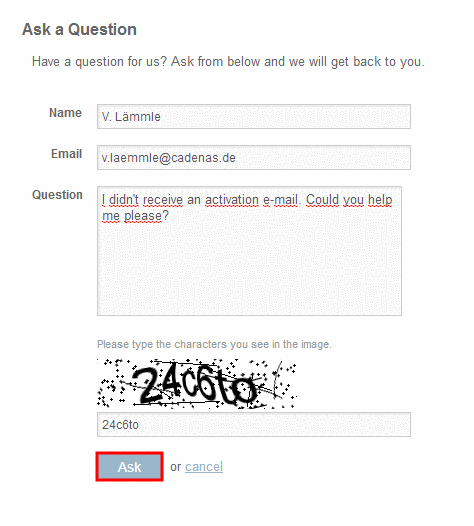
-> For further questions please contact the support team via "Ask Question" in the FAQ area.
-
Click on "Support" and afterwards on "Ask Question".
-
To send the request, please fill out all input fields and click on "Ask".
-
Permalink | 0 comments, 1 like, 15,283 views60% users marked this FAQ as helpful.|5 votesWas this answer helpful? -
-
1.) Go to https://b2b.partcommunity.com/community/partcloud/index#!upload-parts Interesting: Choosing the right license
-
Follow the steps listed below to send a CAD model to your e-mail address. Make sure that you are in the dialog area 3D CA...
Follow the steps listed below to send a CAD model to your e-mail address.
-
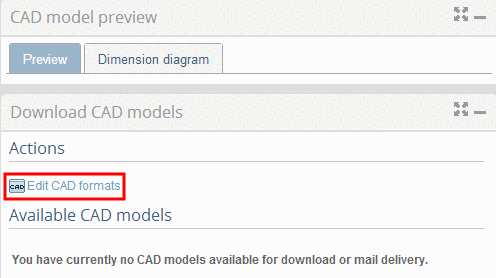
Make sure that you are in the dialog area 3D CAD CATALOGS and navigate to the required part.
-
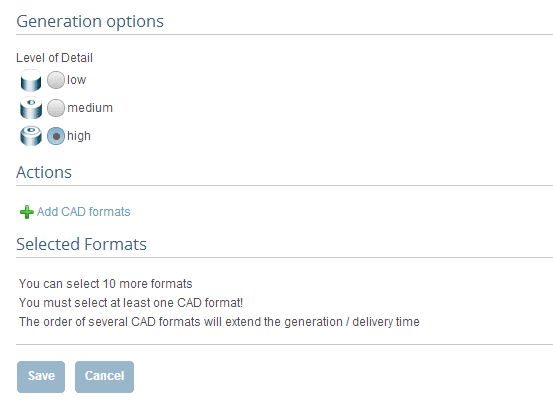
In the dialog area Download CAD models under Edit CAD formats -> Add CAD formats, select the transfer mode email by clicking into the option field. Then define one or more CAD formats and confirm your entries by clicking on Save.
-> The view returns to the dialog area Generation options / Selected formats. Confirm your entries by clicking on Save.
-
Under Actions, click on Generate CAD MODEL.
Note
All formats selected under Download CAD models (dialog area 3D CAD CATALOGS) -> Edit CAD formats ->Selected Formats are generated.
As long as the generation is running, is shown.
 -
As soon as the generation has completed, you will get informed by the note Check your emails that the component was sent by e-mail.
If you close this window, further CAD models can be selected.
Furthermore all generated CAD models are listed under Download CAD models.
-
After clicking on the link Info specific part information is displayed:
-
Status information about generation
-
All formats activated under Download CAD models (dialog area 3D CAD CATALOGS) -> Edit CAD formats -> Selected formats are generated and listed here now.
For some formats you can get some CAD specific information by clicking the Info-Icon
 .
.
The same Info icon you can find underDownload CAD models -> Actions.
In order to import models into the CAD system, do the following:
Permalink | 0 comments, 0 likes, 9,307 views50% users marked this FAQ as helpful.|2 votesWas this answer helpful? -
-
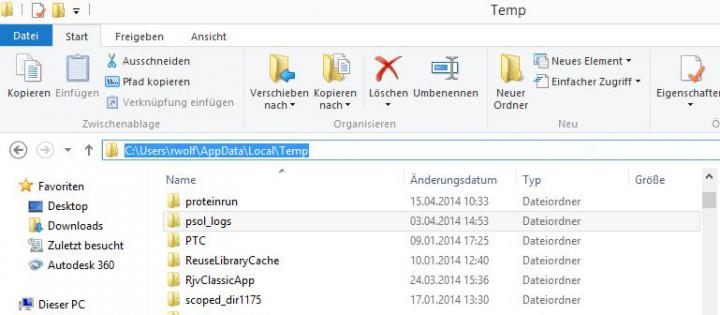
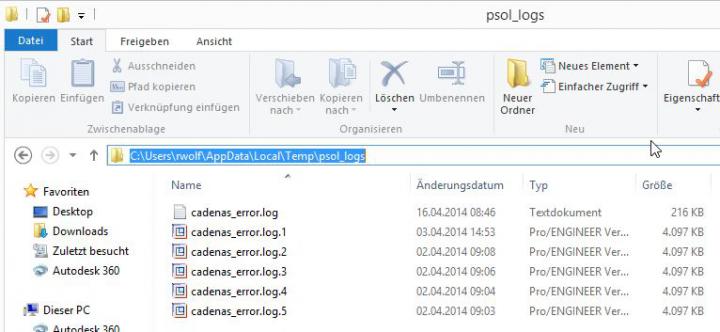
1. Please delete from folder %temp%/psol_logs (within WINexplorer) al files.Now please reproduce the problem and send logfile from this ...
1.
Please delete from folder %temp%/psol_logs (within WINexplorer) al files.
Now please reproduce the problem and send logfile from this folder.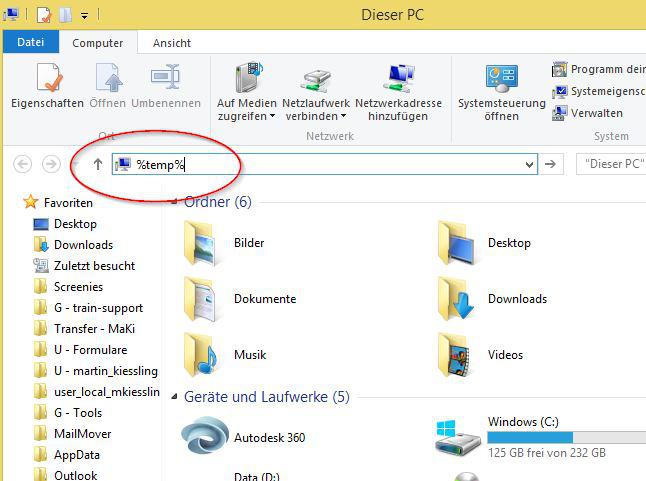
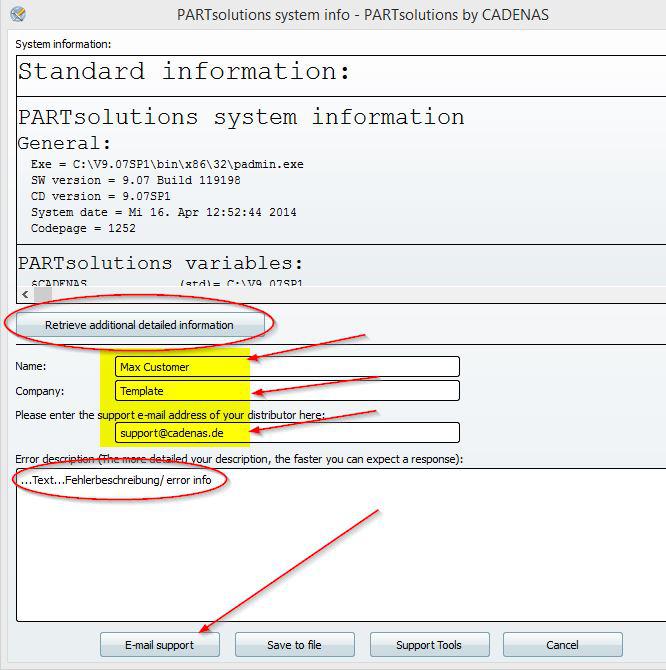
2.
Click button F7 while PARTdatamanager is opend and send the file systeminfo, too.
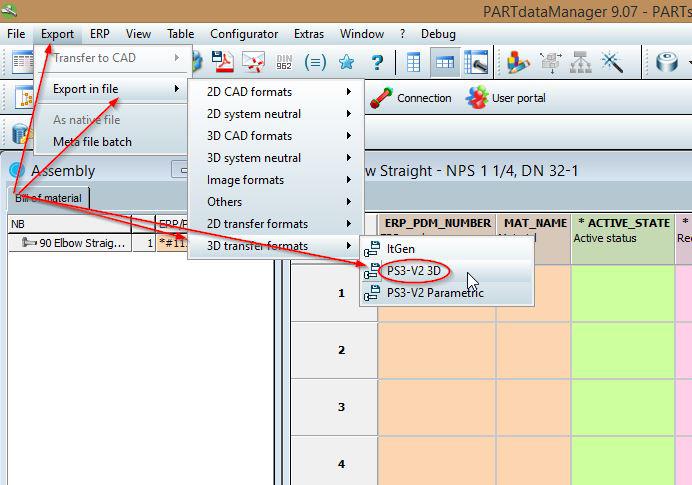
3. (only if problem with a special part)
Please open the part in PARTdatamanager an export it as PS3 V2 3D and add this file, too.
Please send data to support@cadenas.de
Permalink | 0 comments, 0 likes, 15,405 views50% users marked this FAQ as helpful.|2 votesWas this answer helpful? -
The following formats for 3D CAD models and 2D CAD models are available (license dependent): ADEM | Ali...
-
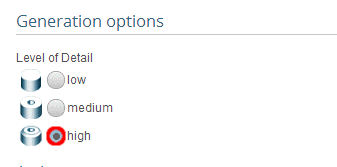
Under 3D CAD CATALOGS you have the possibility to define the level of detail. Make sure that your are in the dialog area ...
Under 3D CAD CATALOGS you have the possibility to define the level of detail.
-
Confirm your entries with Save.
-> The level of detail has been changed.
Permalink | 0 comments, 0 likes, 9,351 views33% users marked this FAQ as helpful.|3 votesWas this answer helpful? -
Please check the following points: - are you logged in on the partal with you account?- can the part be generated in other export format...
Please check the following points:
- are you logged in on the partal with you account?
- can the part be generated in other export formats?If your problem could not be solved please contact the support team
via Ask Question in the FAQ area.
Permalink | 0 comments, 1 like, 13,794 views33% users marked this FAQ as helpful.|9 votesWas this answer helpful?
 Back you reach the previous level.